Last updated: June 21st 2021
Categories: IT Support, Jitsi
Author: Marcus Fleuti
Jitsi Self-Hosted installation with authentication
What is Jitsi?
Jitsi is a collection of open-source projects which provide video conferencing capabilities that are secure, easy to use and easy to self-host.
Requirements
Required OS:
- Ubuntu 18.04 or newer
Required packages:
- gnupg2
- nginx-full
- net-tools
- OpenJDK8 or OpenJDK11
Installation
First you have to make sure that your system is up to date and all of the required packages are installed. After checking that, run the following commands:
apt update
apt install apt-transport-https
apt update
Now that your system is ready, you have to decide what domain you're going to use. When you've chosen your domain let's set a DNS A-Record for that domain using:
- the public server IP-adress
- the IP-adress of the router, if your server has a private IP-adress and connects through NAT
Add the Jitsi package repository
To add the repository type the following commands in your Linux console:
curl https://download.jitsi.org/jitsi-key.gpg.key | sudo sh -c 'gpg --dearmor > /usr/share/keyrings/jitsi-keyring.gpg'
echo 'deb [signed-by=/usr/share/keyrings/jitsi-keyring.gpg] https://download.jitsi.org stable/' | sudo tee /etc/apt/sourced.list.d/jitsi-stable.list > /dev/null
sudo apt update
Configure the firewall
The following ports need to be open in your firewall to allow traffic to the Jitsi Meet server:
- 80 TCP - for SSL verfication with Let's Encrypt
- 443 TCP - general access to Jitsi Meet
- 10000 UDP - video / network communication
- 22 TCP - if you want to access via SSH to your server
- 3478 UDP - for quering the stun server (optional)
- 5349 TCP - fallback for video / audio communication if for e.g. UDP is blocked
If you are using ufw you can use the commands below:
ufw allow 80/tcp
ufw allow 443/tcp
ufw allow 10000/udp
ufw allow 22/tcp
ufw allow 3478/udp
ufw allow 5349/tcp
Now you can go and check the firewall status with:
ufw status verbose
TLS certificate
If you wanna have encrypted communications, you need a TLS certificate. The recommended option is to generate a new self-signed certificate. During the installation you can choose between "I want a self-signed certificate" or "I want to use my own certificate".
Install Jitsi Meet
Type the following command into your Linux machine to install Jitsi Meet:
apt install jitsi-meet
SSL / TLS certificate generation: You are going to be asked what's your preference
Hostname: You will also be asked about the hostname for the Jitsi Meet instance. If you have a domain, use the specific domain name otherwise use the IP-adress.
Jitsi Authentication
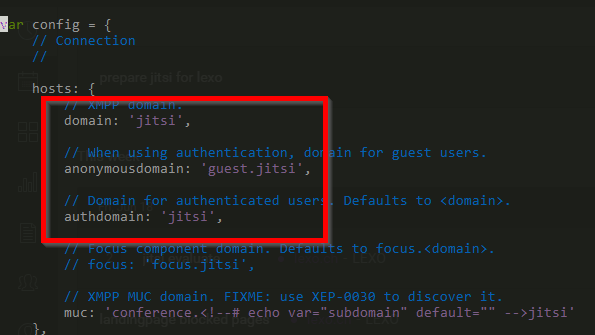
To enable authentication for your Jitsi Meet instance you need to edit the file /etc/prosody/conf.avail/[yourdomain].cfg.lua
Enable Authentication:
Inside the VirtualHost block replace the authentication from "anonymous" to "internal_plain":
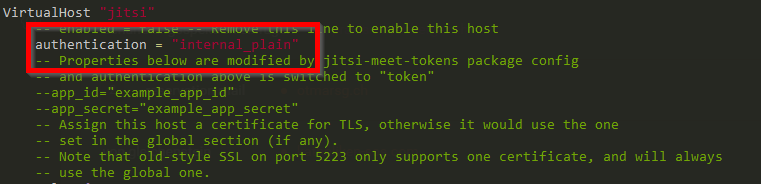
Enable anonymous login for guests:
Add the following block after the previous VirtualHost to enable anonymous login for guests:

Note that guest.jitsi is internal to Jitsi and you should not create a DNS record for it!
Jitsi Meet configuration
You have to edit the file /etc/jitsi/meet/[yourdomain]-config.js
Add the following parameters to the config, otherwise the authentication won't work:
Jicofo configuration
You have to edit the Jicofo configuration because it will accept requests only from the authenticated domain. Insert a new line into the /etc/jitsi/jicofo/sip-communicator.properties file with the following contents:
org.jitsi.jicofo.auth.URL=XMPP.yourdomain
Create users in Prosody (internal auth)
To create a new user you can simply run the following Prosody command:
prosodyctl register <username> meet.domain.com <password>
Now you have to restart all the services you made changes on:
systemctl restart prosody
systemctl restart jicofo
systemctl restart jitsi-videobridge2
Your Jitsi Meet installation should now be ready to go.