Last updated: November 13th 2025
Categories: Apple OS X, IT Knowledge
Author: Miljan Puzovic
Create a Apple macOS Quick Action for Instant FTP Image Uploads
Uploading images to an FTP server doesn't have to be a repetitive chore. If you're a Apple macOS user who frequently shares screenshots, designs, or other images over the internet, you've probably found yourself going through the same tedious process: take a screenshot, open an FTP client, navigate through folders, upload the file, copy the URL, and finally paste it where you need it. That's at least five extra steps every single time.
What if you could reduce that entire workflow to a single right-click? This guide shows you how to create a custom macOS Quick Action that automates the entire process. With just a quick click in Finder, your selected image will be uploaded to your FTP server, and the shareable URL will be instantly copied to your clipboard. No more manual transfers, no more clicking through dialogs. Just pure automation.
By the end of this tutorial, you'll have a professional, seamless workflow that works directly from the Finder context menu. Let's dive in.
What You'll Achieve
This tutorial will guide you through building a custom Quick Action in macOS that performs the following tasks automatically:
- Upload images to your FTP server with a single right-click in Finder
- Generate secure URLs for each uploaded file using randomized filenames
- Copy URLs to your clipboard automatically, ready to share or paste anywhere
- Display notifications confirming successful uploads or alerting you to any errors
- Support multiple image formats (PNG, JPG, WEBP, GIF, and more)
The result is a professional, efficient workflow that saves you countless clicks and minutes every day. Whether you're sharing design mockups with clients, collaborating with team members, or publishing content, this Quick Action streamlines your entire process.
Prerequisites and Dependencies
What You Need Before Starting
Before you begin, make sure you have the following in place:
- macOS 10.13 or later (Quick Actions are available on all modern Apple macOS versions)
- Homebrew installed on your system (if you don't have it, visit brew.sh)
- An active FTP server with valid credentials (username, password, server address)
- Basic terminal familiarity – nothing advanced, just the ability to paste commands
- Automator app (included by default with macOS)
Installing lftp
The script relies on lftp, a powerful command-line FTP client. Installing it is straightforward with Homebrew. Open your terminal and run the following command:
brew install lftpThis will download and install lftp, including all necessary dependencies. The installation typically completes in under a minute, depending on your internet connection.
Once installed, verify the installation by checking the lftp version:
lftp --versionYou should see version information printed to your terminal. If you do, you're ready to proceed.
Step 1: Install lftp via Homebrew
lftp is the core component that enables secure FTP connections from your script. Homebrew makes installation painless. In your terminal, paste the following command and press Enter:
brew install lftpWait for Homebrew to complete the installation. Once finished, you're ready to create the upload script.
Step 2: Create Your FTP Upload Script
Setting Up the Script File
Now you'll create the bash script that does the heavy lifting. This script handles the FTP connection, file upload, and URL handling.
Create a new file called upload-script.sh in a convenient location (for example, your home directory or a dedicated scripts folder). You can do this in any text editor – Terminal, VS Code, or even TextEdit (just make sure to save it as plain text, not rich text).
Here's the complete script. Copy the code below and paste it into your new file:
#!/bin/bash

# Wait 1 seconds for the screenshot file to be written to the harddrive
sleep 1

# Configuration variables
# On macOS with Homebrew, lftp is typically at:
LFTP_PATH="/opt/homebrew/bin/lftp"
# Or if not using Apple Silicon (M series):
# LFTP_PATH="/usr/local/bin/lftp"

FTP_SERVER_URI="share.yourdomain.tld"
FTP_USERNAME="user@your-ftp-server.tld"
FTP_PASSWORD="password"
URL_PATH="https://screenshare.yourdomain.tld"

# Get the image file from arguments
IMAGE_FILE="$1"

if [ ! -f "$IMAGE_FILE" ]; then
  osascript -e "display notification \"No image file selected\" with title \"Error\""
  exit 1
fi

RANDOM_HASH=$(openssl rand -hex 4)
FILE_EXTENSION="${IMAGE_FILE##*.}"
REMOTE_FILENAME="${RANDOM_HASH}.${FILE_EXTENSION}"
IMAGE_URL_PATH="${URL_PATH}/${REMOTE_FILENAME}"

# Upload via lftp
LFTP_OUTPUT=$(${LFTP_PATH} -e "set ftp:ssl-protect-data true; set ssl:verify-certificate no; put '${IMAGE_FILE}' -o /${REMOTE_FILENAME}; bye" -u ${FTP_USERNAME},${FTP_PASSWORD} -p 21 ftp://${FTP_SERVER_URI} 2>&1)

# Check result
if [ $? -eq 0 ]; then
  echo "${IMAGE_URL_PATH}" | pbcopy
  osascript -e "display notification \"${IMAGE_URL_PATH}\" with title \"Image uploaded.\""
else
  osascript -e "display notification \"${LFTP_OUTPUT}\" with title \"Error uploading image.\""
fi
Understanding the Script Components
Let's break down what this script does:
The sleep command: Gives the system time to write the file to disk before attempting the upload.
The lftp path: Specifies where Homebrew installed lftp. On Apple Silicon Macs (M1, M2, M3), the path is /opt/homebrew/bin/lftp. On Intel Macs, use /usr/local/bin/lftp if the first path doesn't work.
Configuration variables: These are the details you'll customize with your own FTP credentials. You'll fill these in with your server information.
File handling: The script generates a random filename to prevent conflicts and preserves the original file extension.
Upload command: Uses lftp to securely upload the file to your server.
Notifications: Displays system notifications to confirm successful upload or alert you to errors.
Customizing Your Credentials
Open your upload-script.sh file and update these lines with your actual FTP information:
FTP_SERVER_URI="share.yourdomain.tld" – Replace with your FTP server address
FTP_USERNAME="user@your-ftp-server.tld" – Replace with your FTP username
FTP_PASSWORD="password" – Replace with your FTP password
URL_PATH="https://screenshare.yourdomain.tld" – Replace with the public URL where your FTP files are accessible
Save the file after making these changes. Remember the full path to this file – you'll need it shortly. For example, if you saved it in your home directory, the path would be something like /Users/yourusername/upload-script.sh.
Step 3: Open Automator and Create a New Quick Action
Now that your script is ready, it's time to integrate it into macOS Finder using Automator.
Open Automator (you can find it in Applications > Automator, or search for it using Spotlight with Command+Space).
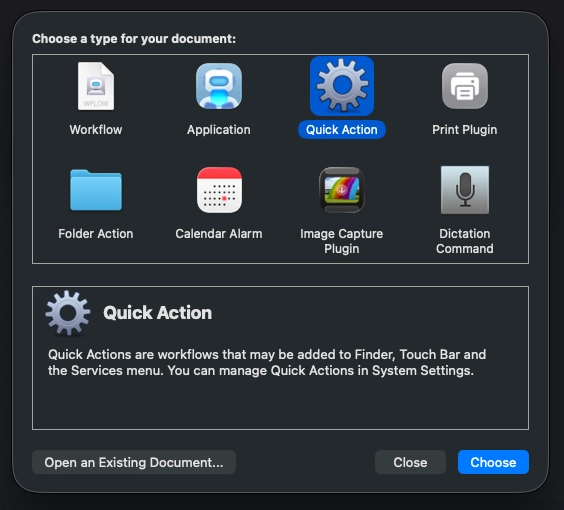
When Automator opens, it will prompt you to select a document type. Choose "Quick Action" from the available options. This creates a context menu action that appears when you right-click files in Finder.
Step 4: Configure the Quick Action Settings
Once you've selected "Quick Action," you'll see the Automator workspace. Before adding any actions, configure these settings:
Workflow receives current: Click the dropdown that says "Workflow receives current" and select "image files" instead of the default "any" option.
in: Make sure this is set to "Finder". This ensures your Quick Action only appears when right-clicking in Finder.
These settings ensure your new Quick Action shows up only when right-clicking image files, keeping your context menu clean and organized.
Step 5: Add the Run Shell Script Action
Now you'll add the actual action to your workflow. On the left side of Automator, click "Library" and search for "Run Shell Script". Click on it to add it to your workflow.
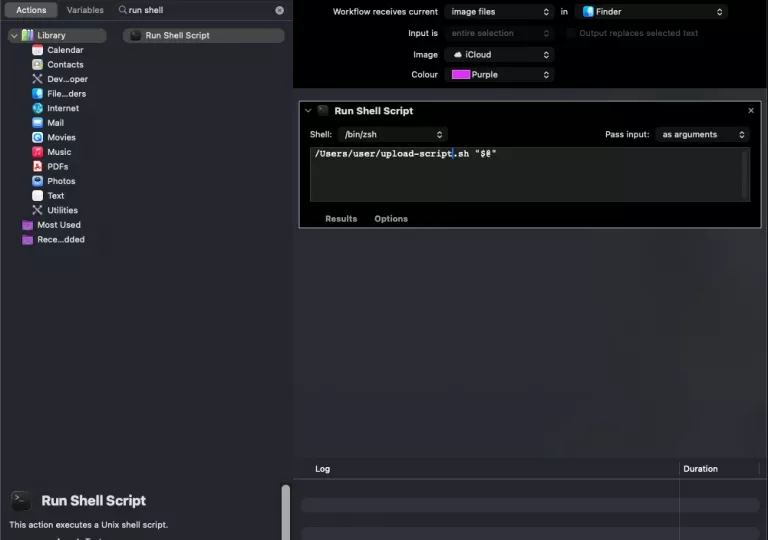
You'll see a text field where you can enter shell commands. In this field, type the path to your upload script, followed by "$@":
/Users/yourusername/upload-script.sh "$@"Replace /Users/yourusername with the actual path where you saved your upload-script.sh file. The "$@" passes the selected image file to your script.
With your script configured, it's time to add the finishing touch – a custom icon and a memorable name.
At the top of the Automator window, look for the icon placeholder (typically a generic script icon). Click on it to select a custom icon. Choose an image that represents uploading or sharing – this makes your Quick Action easier to identify in the context menu.
Now save your Quick Action by pressing Command+S (or File > Save). The name you give your Quick Action will appear in the context menu when you right-click images. Choose something descriptive like "Upload to LEXO Share" or "Upload to FTP Server".
Automator will save your Quick Action to the appropriate location automatically. You're done with setup!
Step 7: Test Your New Quick Action
Testing the Upload Workflow
Now for the moment of truth. Let's test your new Quick Action:
- Take a screenshot or select any image file on your Mac
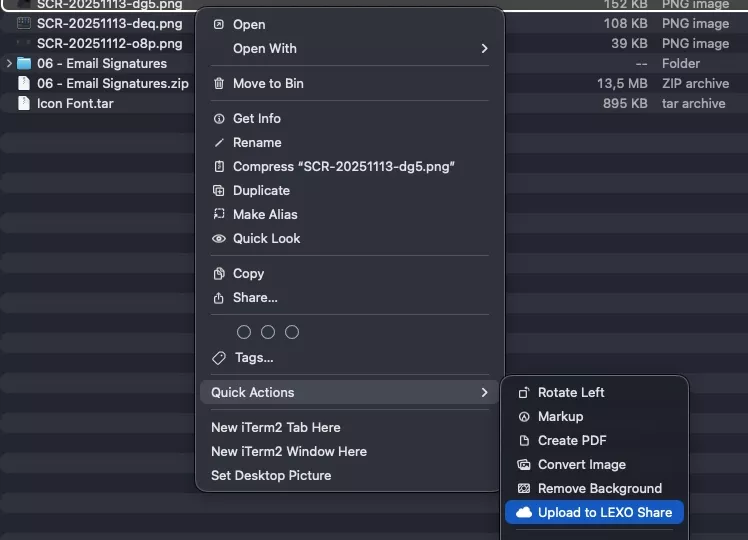
- Right-click the image in Finder
- Look for your Quick Action in the context menu (you may need to scroll to see it, as it appears under "Quick Actions")
- Click it and watch the magic happen
If everything is working correctly, you'll see a macOS notification confirming the upload and displaying the image URL. The URL will automatically be copied to your clipboard – just paste it anywhere you need it.
What Success Looks Like
After the upload completes, you'll receive a notification showing the full URL of your uploaded image. For example:
https://screenshare.yourdomain.tld/a1b2c3d4.pngThat URL is now in your clipboard, ready to paste into Slack, email, a document, or anywhere else you need to share the image. The entire process happens in seconds, from right-click to clipboard-ready URL.
How This Script Works Under the Hood
Understanding what's happening behind the scenes helps you troubleshoot if needed and appreciate the efficiency of this setup.
File selection and validation: When you right-click an image and select your Quick Action, Automator passes the file path to your bash script. The script first checks that the file actually exists.
Unique filename generation: To prevent filename collisions on your server, the script generates a random 8-character hexadecimal string and appends it to the original file extension. This ensures every uploaded image has a unique name.
Secure FTP connection: lftp establishes an encrypted connection to your FTP server using the credentials you configured. The connection is then immediately closed after the upload completes.
URL construction and clipboard copying: After successful upload, the script constructs the full public URL and uses the pbcopy command to copy it to your clipboard.
User feedback: Notifications appear on your screen to confirm the action, displaying either the successful URL or error details if something went wrong.
Customization Tips
Changing the Server Destination Folder
By default, files upload to the root directory of your FTP server. To upload to a specific folder, modify the lftp command in your script. For example, to upload to a folder called uploads:
put '${IMAGE_FILE}' -o /uploads/${REMOTE_FILENAME}Adding Multiple Server Support
You can create multiple versions of this Quick Action pointing to different servers. Simply duplicate your upload script, give it a new name, update the FTP credentials, and create a new Quick Action for each one. This lets you choose which server to upload to directly from the context menu.
Adjusting Notification Behavior
If you prefer not to see notifications, remove or comment out the osascript lines in your script. To comment out a line, add a # at the beginning.