Last updated: December 18th 2023
Categories: Hardware and Gadgets
Author: LEXO
[solved] XMRIG CPU #xx warning: "can't bind memory" - XMRIG does not run on all CPU cores
XMRIG CPU #xx warning: "can't bind memory" - XMRIG does not run on all CPU cores
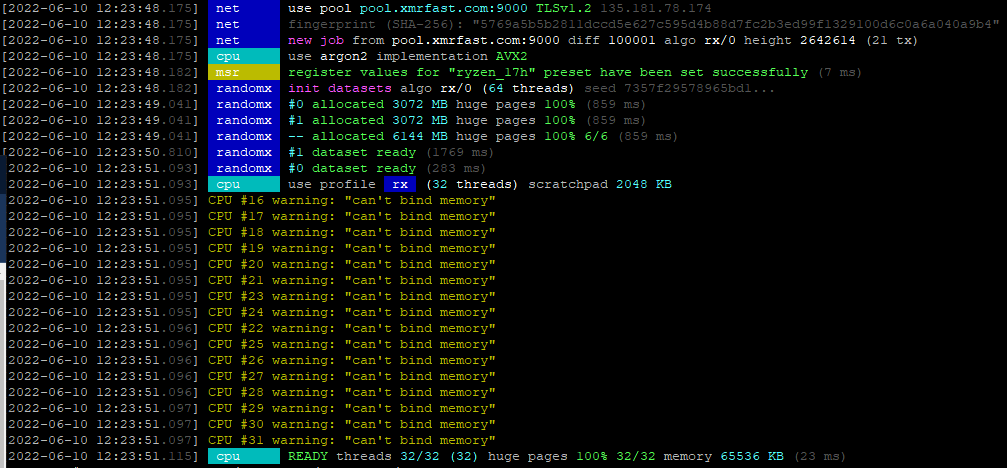
In some cases it can happen that XMRIG provides the following error messages:
What is the problem with the XMRIG miner and the computers' hardware?
This issue is unlikely to be resolved by installing a different operating system, as it is probably not software-related. However, if you're running XMRIG in a virtual machine, that might be causing the problem. On a dedicated server, it's more likely a hardware issue.
How a CPU allocates memory for XMRIG
The CPU must rapidly and continuously exchange data with the computer's memory, especially when running an XMRIG miner. Each CPU core requires direct access to the memory via high-speed connections. The mainboard's design, determined by the manufacturer, specifies the mechanical connections between each CPU and its corresponding memory socket. The mainboard manual details how to configure the memory to ensure all CPU cores can properly access it. An example illustration is provided below:
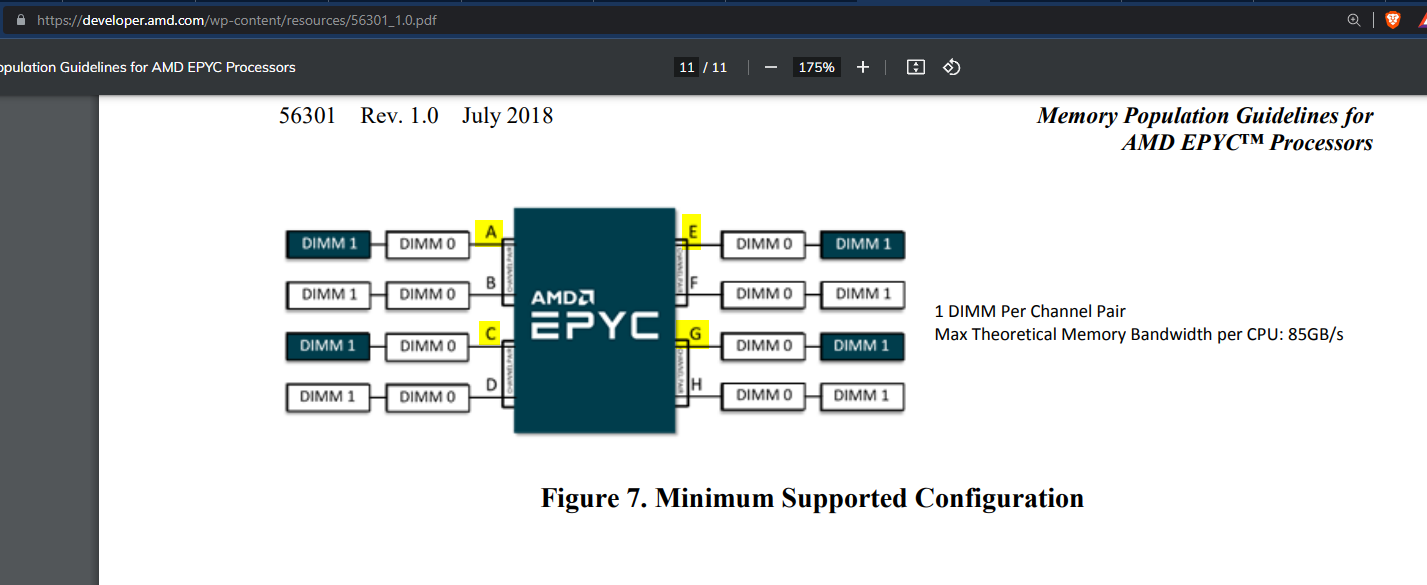
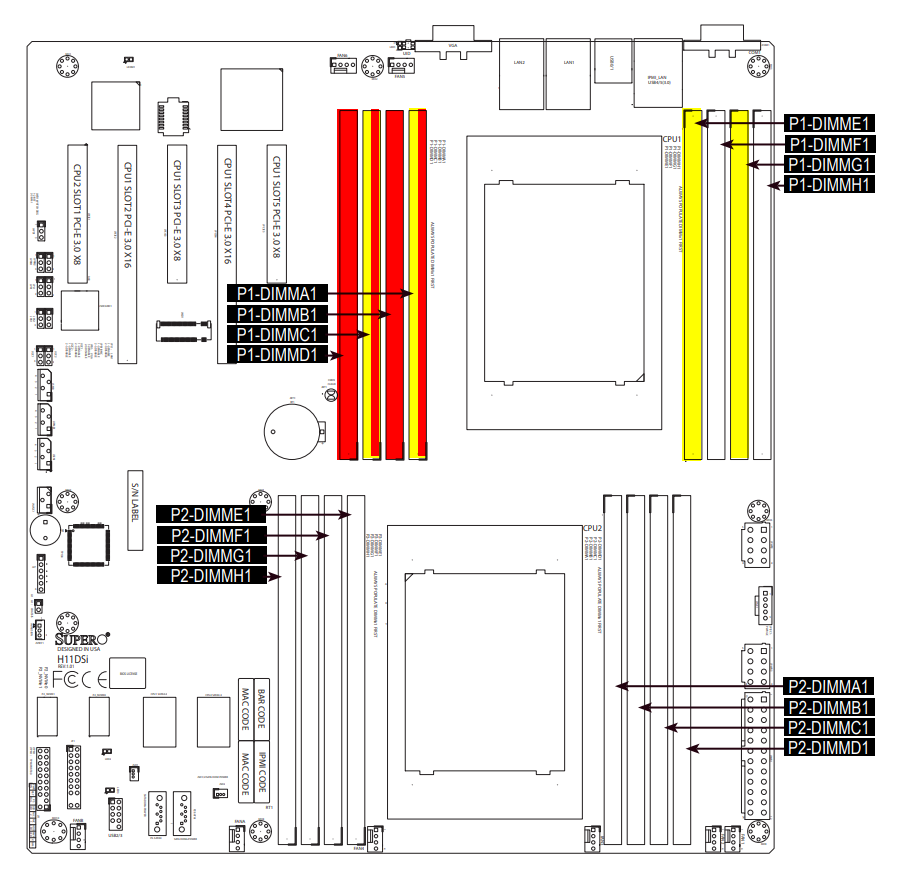
This motherboard is designed to support up to two DIMMs per CPU lane. Installing more DIMMs enhances the speed of data transfer between the memory and the CPU. For example, with the current setup, the bandwidth is 85GB/s, but installing two DIMMs per lane could potentially double this throughput. To function optimally, this CPU requires a minimum of four DIMMs, which must be installed precisely as indicated in the illustration, specifically into slots A1, C1, E1, and G1. Other illustrations, although somewhat more complex, convey similar information, such as the following example:

The server can operate with fewer than four DIMMs, but this configuration limits its ability to use all cores. If DIMMs are placed in incorrect sockets, the CPU won't be able to access them, resulting in the deactivation of any cores dependent on those specific sockets. Consequently, the system would only be able to utilize 50% of the installed RAM. During boot-up, the system may recognize and report the presence of 4 DIMMs, equating to 32GB of RAM (assuming 8GB per socket). However, if the DIMMs are installed incorrectly, they are effectively non-existent to the system. A notable limitation is that most systems do not alert technicians to such incorrect setups, potentially leading to unrecognized performance issues.
Optimal Memory Installation on the Mainboard for Efficient XMRIG Performance
To ensure XMRIG operates effectively, memory DIMMs must be installed correctly on the motherboard. In our situation, incorrect installation by the technician resulted in only 50% utilization of both the CPU and RAM. XMRIG reported an inability to use more CPU cores due to this memory allocation issue.
The accompanying graphic will illustrate the actual DIMM installation (marked in red) versus the correct installation (marked in yellow). This visual comparison will highlight the proper placement of DIMMs to fully leverage the CPU and RAM capacities for optimal XMRIG performance.
Once the RAM is installed properly the system will be able to utilize 100% of it's cores.
LINUX GUIDE
How to find out if my memory has been installed correctly?
In Linux you can install the tool numactl which allows you to see which cores are accessing which part of the memory. In Ubuntu/Debian Linux distributions you need to first isntall the numactl tool like this:
apt install numactl
Once installed call it up like this:
numactl --hardware
If your CPU/Memory configuration is broken you would see an output like the one below. Please take special node on the "node 2" and "node 3" configuration, which states 0 MB each:
node 0 cpus: 0 1 2 3 4 5 6 7 32 33 34 35 36 37 38 39
node 0 size: 15959 MB
node 0 free: 11069 MB
node 1 cpus: 8 9 10 11 12 13 14 15 40 41 42 43 44 45 46 47
node 1 size: 16065 MB
node 1 free: 11302 MB
node 2 cpus: 16 17 18 19 20 21 22 23 48 49 50 51 52 53 54 55
node 2 size: 0 MB
node 2 free: 0 MB
node 3 cpus: 24 25 26 27 28 29 30 31 56 57 58 59 60 61 62 63
node 3 size: 0 MB
node 3 free: 0 MB
node distances:
node 0 1 2 3
  0: 10 16 16 16
  1: 16 10 16 16
  2: 16 16 10 16
  3: 16 16 16 10
As you can see, the nodes 2 and 3 (managing 50% of all available CPU threads) do not have any memory allocated to them. That's why XMRIG cannot use those cores at all and is complaining about not being able to bind memory to them.
After fixing the issue this is how the numactl --hardware output looks like:
node 0 cpus: 0 1 2 3 4 5 6 7 32 33 34 35 36 37 38 39
node 0 size: 7883 MB
node 0 free: 7024 MB
node 1 cpus: 8 9 10 11 12 13 14 15 40 41 42 43 44 45 46 47
node 1 size: 8025 MB
node 1 free: 7217 MB
node 2 cpus: 16 17 18 19 20 21 22 23 48 49 50 51 52 53 54 55
node 2 size: 8059 MB
node 2 free: 6990 MB
node 3 cpus: 24 25 26 27 28 29 30 31 56 57 58 59 60 61 62 63
node 3 size: 8056 MB
node 3 free: 7203 MB
node distances:
node   0   1   2   3
  0:  10  16  16  16
  1:  16  10  16  16
  2:  16  16  10  16
  3:  16  16  16  10
Check the hardware configuration and the mainboard manual
Check your computers' hardware with this command:
lshw
In case your computer does not find this command you might need to install it with:
apt install lshw
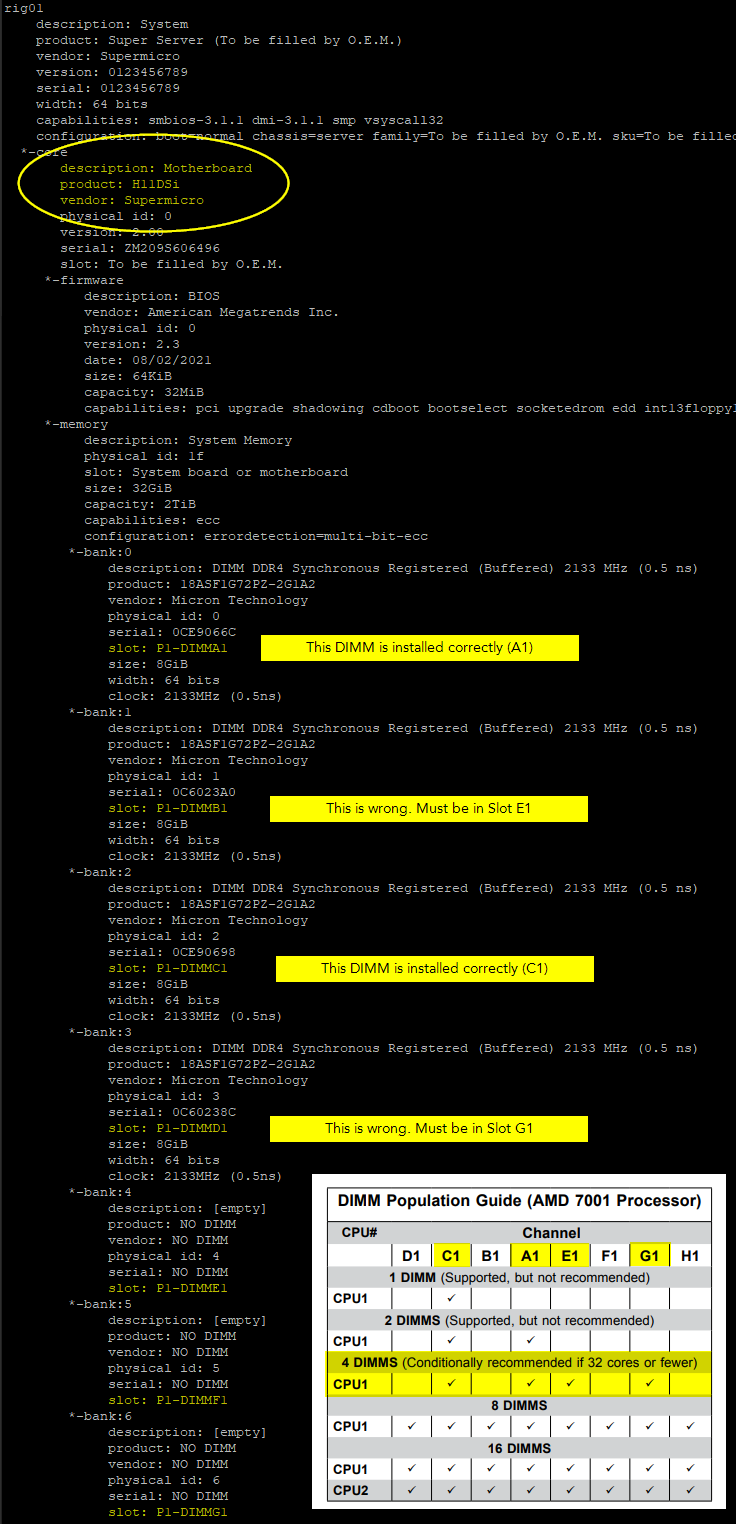
Based on the motherboard details you can see its vendor and type. With this information you can download the motherboard manual online and check for the correct DIMM configuration. The following screenshot explains:
The solution
Installing the memory correctly (and enough memory modules to support all cores) will most probably solve your problem with the XMRIG miner not being able to bind memory.
By the way...
XMRIG miner version 6.17.0 tells you which DIMM is installed in which socket of the mainboard, look closely:

With this information and the mainboard manual at hand you'll be able to find out if the DIMMs are installed correctly.